OAuth authentication
The goal of Auth.js is that you can add authentication easily to your project with just a few lines of code.
The fastest way to set up Auth.js is with an OAuth provider. In this tutorial, we'll be setting Auth.js in a web application to be able to log in with GitHub.
Auth.js comes with a list of built-in providers (Google, Facebook, Twitter, etc.). You can also integrate it with your OAuth service by building a custom provider.
1. Configuring Auth.js
To add Auth.js to your project:
- Next.js
- SvelteKit
- SolidStart
- Vanilla (No Framework)
Prerequisites
This tutorial assumes you have a Next.js application set up. If you don't, you can follow the Next.js tutorial to get started.
Installing NextAuth.js
- npm
- Yarn
- pnpm
npm install next-auth
yarn add next-auth
pnpm add next-auth
Creating the server config
Create the following API route file. This route contains the necessary configuration for NextAuth.js, as well as the dynamic route handler:
import NextAuth from "next-auth"
import GithubProvider from "next-auth/providers/github"

export default NextAuth({
  providers: [
    GithubProvider({
      clientId: process.env.GITHUB_ID,
      clientSecret: process.env.GITHUB_SECRET,
    }),
  ],
})
Behind the scenes, this creates all the relevant OAuth API routes within /api/auth/* so that auth API requests to:
- GET
/api/auth/signin - POST
/api/auth/signin/:provider - GET/POST
/api/auth/callback/:provider - GET
/api/auth/signout - POST
/api/auth/signout - GET
/api/auth/session - GET
/api/auth/csrf - GET
/api/auth/providers
can be handled by NextAuth.js. In this way, NextAuth.js stays in charge of the whole application's authentication request/response flow.
NextAuth.js is fully customizable - our guides section teaches you how to set it up to handle auth in different ways. All the possible configuration options are listed here.
Adding environment variables
You may notice we are using environment variables in the code example above. We take the value of GITHUB_ID and GITHUB_SECRET from the GitHub Developer OAuth Portal. See Configuring OAuth Provider section on how to get those.
In your project root, create a .env.local file and add the NEXTAUTH_SECRET environment variable:
NEXTAUTH_SECRET="This is an example"
NEXTAUTH_SECRET is a random string used by the library to encrypt tokens and email verification hashes, and it's mandatory to keep things secure! 🔥 🔐 . You can use:
openssl rand -base64 32
or https://generate-secret.vercel.app/32 to generate a random value for it.
Exposing the session via SessionProvider:
NextAuth.js provides useSession() - a React Hooks to access the session data and status. To use it first you'll need to expose the session context - <SessionProvider /> - at the top level of your application:
import { SessionProvider } from "next-auth/react"
import type { AppProps } from "next/app"

export default function App({
  Component,
  pageProps: { session, ...pageProps },
}: AppProps) {
  return (
    <SessionProvider session={session}>
      <Component {...pageProps} />
    </SessionProvider>
  )
}
Instances of useSession (more on it in the next section) will have access to the session data and status. The <SessionProvider /> also keep the session updated and synced between browser tabs and windows. 💪🏽
Check our client docs to learn all the available options for handling sessions on the browser.
Consuming the session via hooks
You can use the useSession hook from anywhere in your application (E.g. in a header component). Behind the scenes, the hook will connect to the <SessionProvider /> to read the current user session. Learn more about React Context in the React docs.
import { useSession, signIn, signOut } from "next-auth/react"

export default function CamperVanPage() {
  const { data: session, status } = useSession()
  const userEmail = session?.user?.email

  if (status === "loading") {
    return <p>Hang on there...</p>
  }

  if (status === "authenticated") {
    return (
      <>
        <p>Signed in as {userEmail}</p>
        <button onClick={() => signOut()}>Sign out</button>
        <img src="https://cdn.pixabay.com/photo/2017/08/11/19/36/vw-2632486_1280.png" />
      </>
    )
  }

  return (
    <>
      <p>Not signed in.</p>
      <button onClick={() => signIn("github")}>Sign in</button>
    </>
  )
}
Protecting API Routes
To protect your API Routes (blocking unauthorized access to resources), you can use getServerSession() to know whether a session exists or not:
import { getServerSession } from "next-auth/next"
import { authOptions } from "../auth/[...nextauth]"

export default async function listMovies(req, res) {
  const session = await getServerSession(req, res, authOptions)

  if (session) {
    res.send({
      movies: [
        { title: "Alien vs Predator", id: 1 },
        { title: "Reservoir Dogs", id: 2 },
      ],
    })
  } else {
    res.send({
      error: "You must sign in to view movies.",
    })
  }
}
@auth/sveltekit is currently experimental. The API will change in the future.
Prerequisites
This tutorial assumes you have a SvelteKit application set up. If you don't, you can follow the SvelteKit tutorial to get started.
Installing Auth.js
- npm
- Yarn
- pnpm
npm install @auth/core @auth/sveltekit
yarn add @auth/core @auth/sveltekit
pnpm add @auth/core @auth/sveltekit
Create server hook
Create the following Server hook file. This route contains the necessary configuration for Auth.js, as well as the dynamic route handler:
import { SvelteKitAuth } from "@auth/sveltekit"
import GitHub from "@auth/core/providers/github"
import { GITHUB_ID, GITHUB_SECRET } from "$env/static/private"

export const handle = SvelteKitAuth({
  providers: [GitHub({ clientId: GITHUB_ID, clientSecret: GITHUB_SECRET })],
})
Behind the scenes, this creates all the relevant OAuth API routes within /api/auth/* so that auth API requests to:
- GET
/api/auth/signin - POST
/api/auth/signin/:provider - GET/POST
/api/auth/callback/:provider - GET
/api/auth/signout - POST
/api/auth/signout - GET
/api/auth/session - GET
/api/auth/csrf - GET
/api/auth/providers
can be handled by Auth.js. In this way, Auth.js stays in charge of the whole application's authentication request/response flow.
Auth.js is fully customizable - our guides section teaches you how to set it up to handle auth in different ways. All the possible configuration options are listed here.
Adding environment variables
You may notice we are using environment variables in the code example above. We take the value of GITHUB_ID and GITHUB_SECRET from the GitHub Developer OAuth Portal. See Configuring OAuth Provider section on how to get those.
In your project root, create a .env.local file and add the AUTH_SECRET environment variable:
AUTH_SECRET="This is an example"
AUTH_SECRET is a random string used by the library to encrypt tokens and email verification hashes, and it's mandatory to keep things secure! 🔥 🔐 . You can use:
openssl rand -base64 32
or https://generate-secret.vercel.app/32 to generate a random value for it.
Exposing the session via page store
Auth.js provides us a auth, function to access the session data and status, to call from the event.locals variable. We can now just call it and add it to our $page store.
import type { LayoutServerLoad } from "./$types"

export const load: LayoutServerLoad = async (event) => {
  return {
    session: await event.locals.auth(),
  }
}
Consuming the session via page store
You can use the $page.data.session variable from anywhere on your page. Learn more about SvelteKit's page store in the SvelteKit docs.
<script>
  import { signIn, signOut } from '@auth/sveltekit/client'
  import { page } from '$app/stores'
</script>

{#if $page.data.session?.user}
  <p>Signed in as {$page.data.session.user.email}</p>
  <button on:click={signOut}>Sign out</button>
  <img src="https://cdn.pixabay.com/photo/2017/08/11/19/36/vw-2632486_1280.png" />
{:else}
  <p>Not signed in.</p>
  <button on:click={() => signIn('github')}>Sign in</button>
{/if}
Protecting API Routes
To protect your API Routes (blocking unauthorized access to resources), you can use locals.auth() just like in the layouts file to know whether a session exists or not:
import { json, error } from "@sveltejs/kit"
import type { RequestEvent } from "./$types"

export async function GET({ locals }: RequestEvent) {
  const session = await locals.auth()
  if (!session?.user) {
    throw error(401, "You must sign in to view movies.")
  }

  return json({
    movies: [
      { title: "Alien vs Predator", id: 1 },
      { title: "Reservoir Dogs", id: 2 },
    ],
  })
}
TODO: SolidStart
TODO Core
2. Configuring OAuth Provider
Ok, we have our app set up with NextAuth.js, however, if you run the app right now, it won't work as we haven't configured our OAuth provider (GitHub) yet.
When using OAuth you're asking for a third-party service (in this case GitHub, although it could be Google, Twitter, etc...) to handle user authentication for your app.
We need to register our new app in GitHub, so that when NextAuth.js forwards the authorization requests to it, GitHub can recognize your application and prompt the user to sign in.
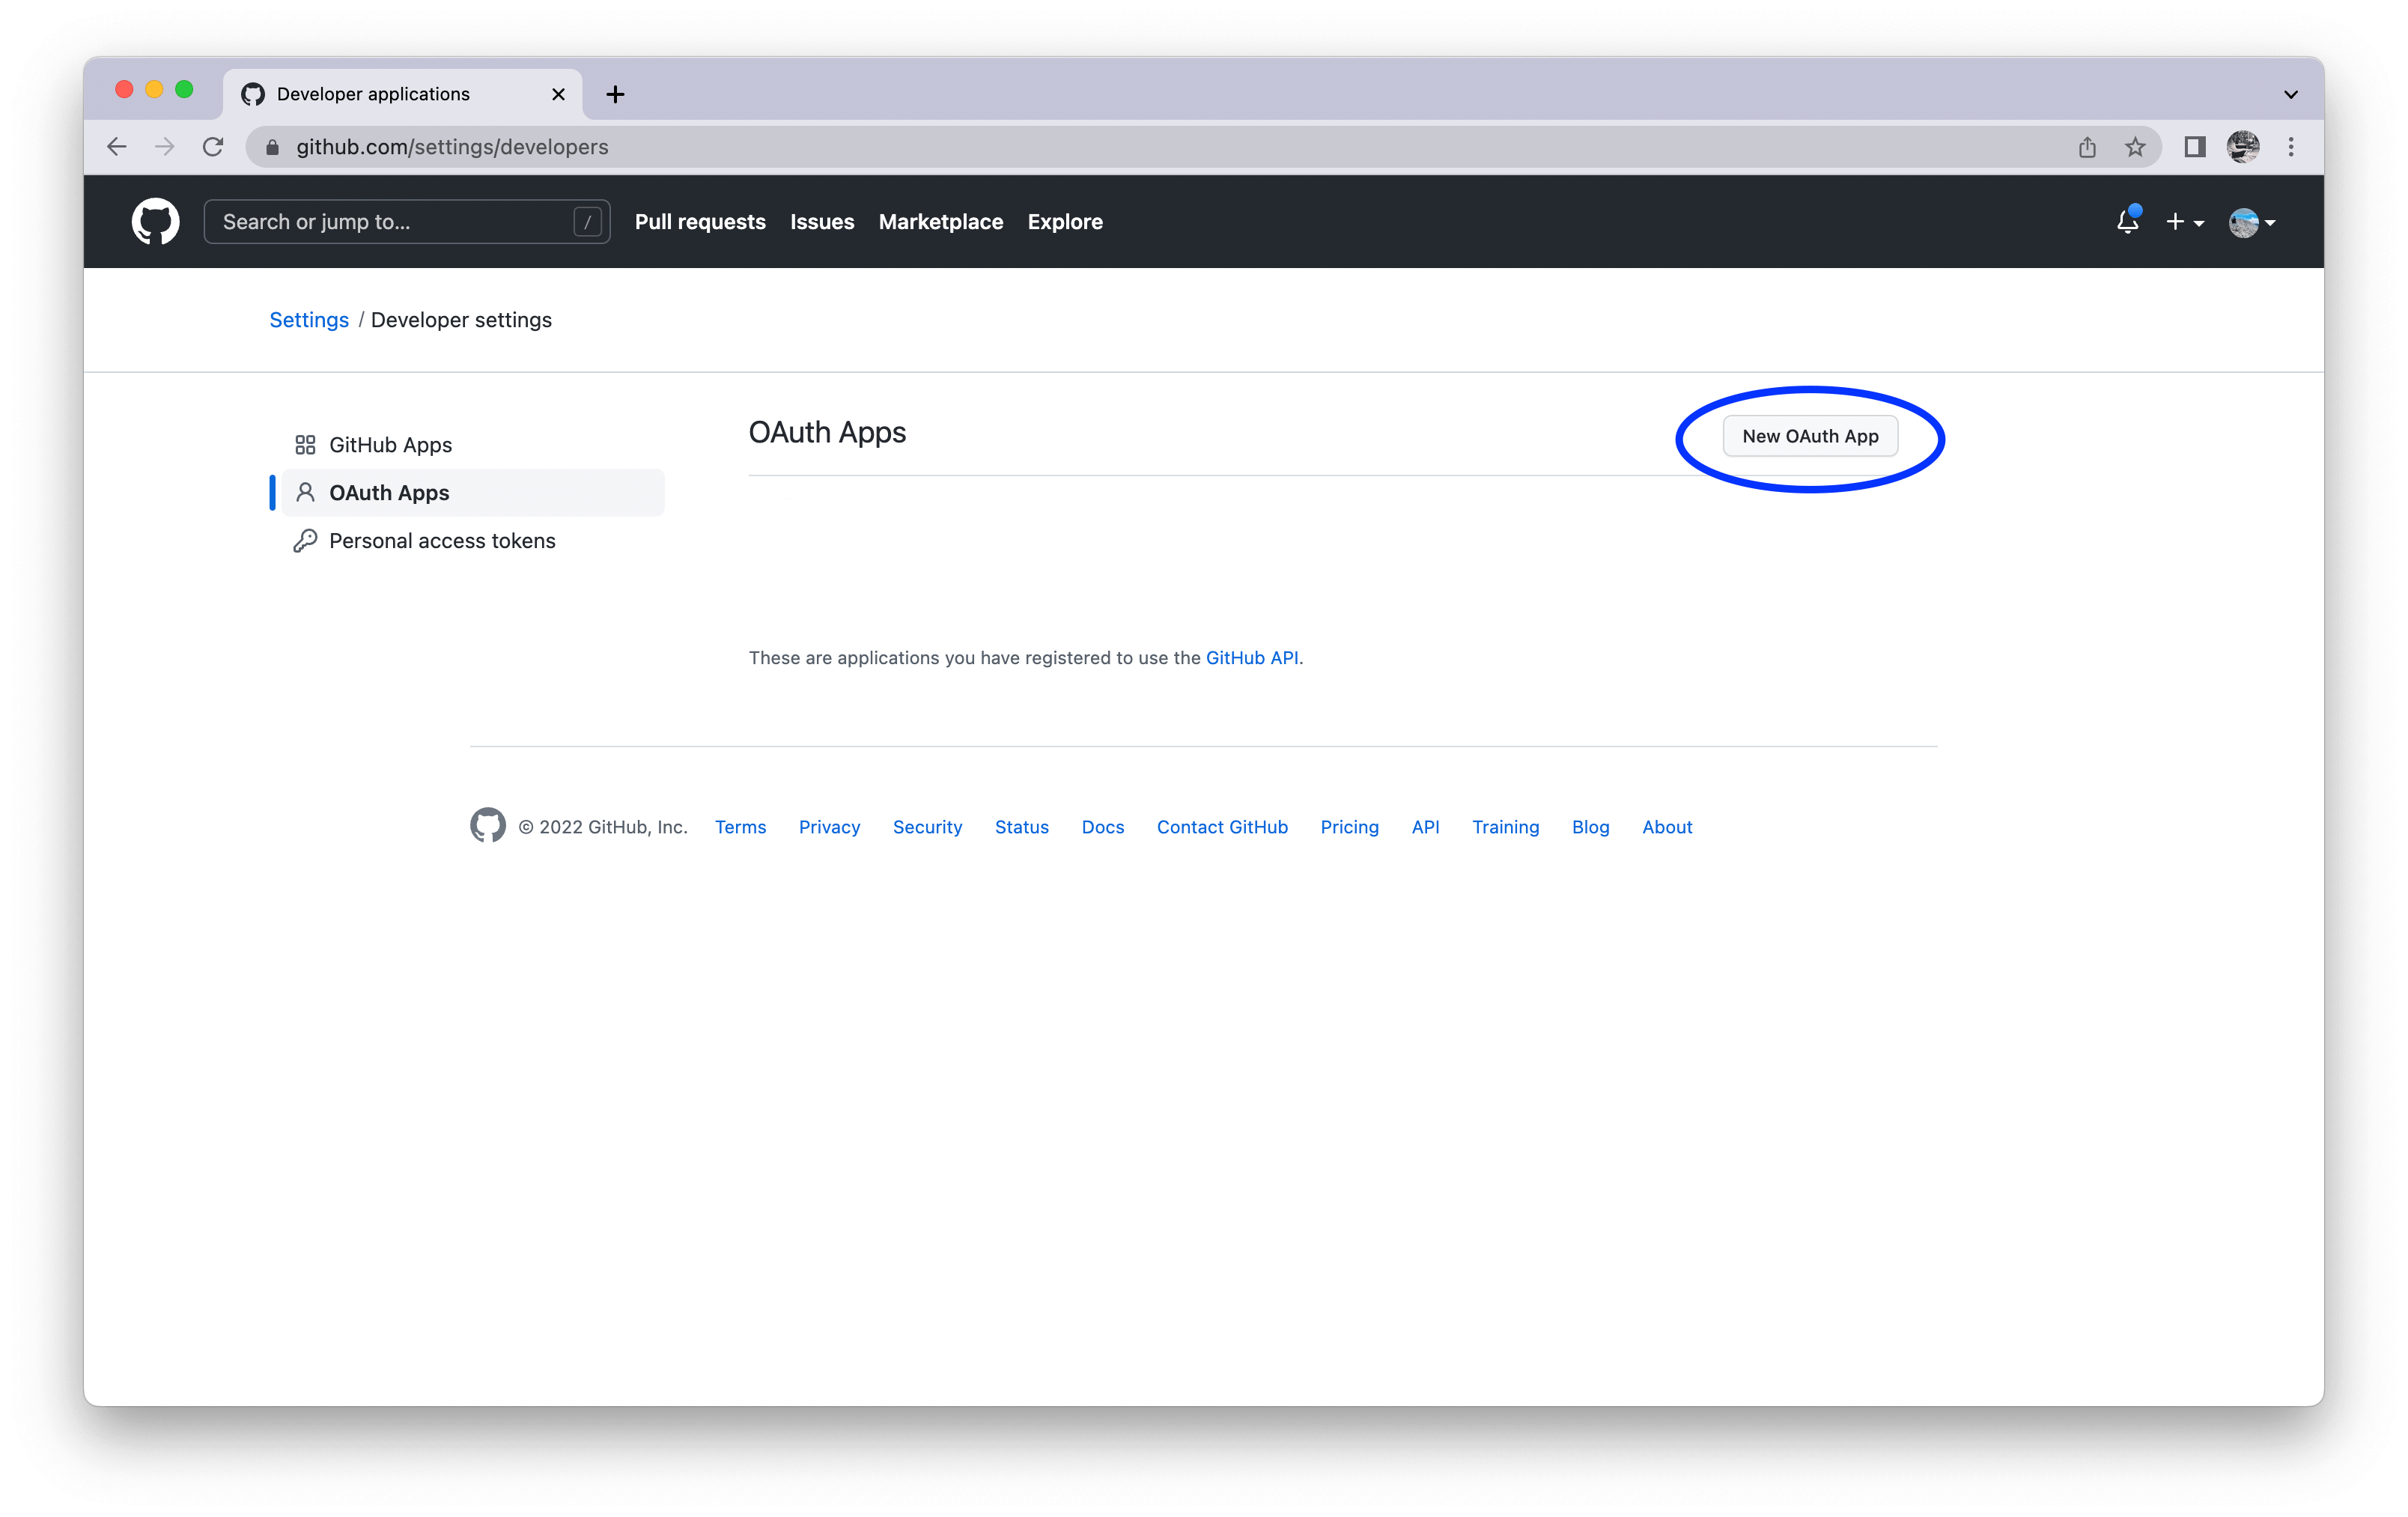
Log in to GitHub, go to Settings / Developers / OAuth Apps and click "New OAuth App"
Next, you'll be presented with a screen to add details about your new application. Fill in the required fields, but pay extra attention to the Authorization Callback URL one:
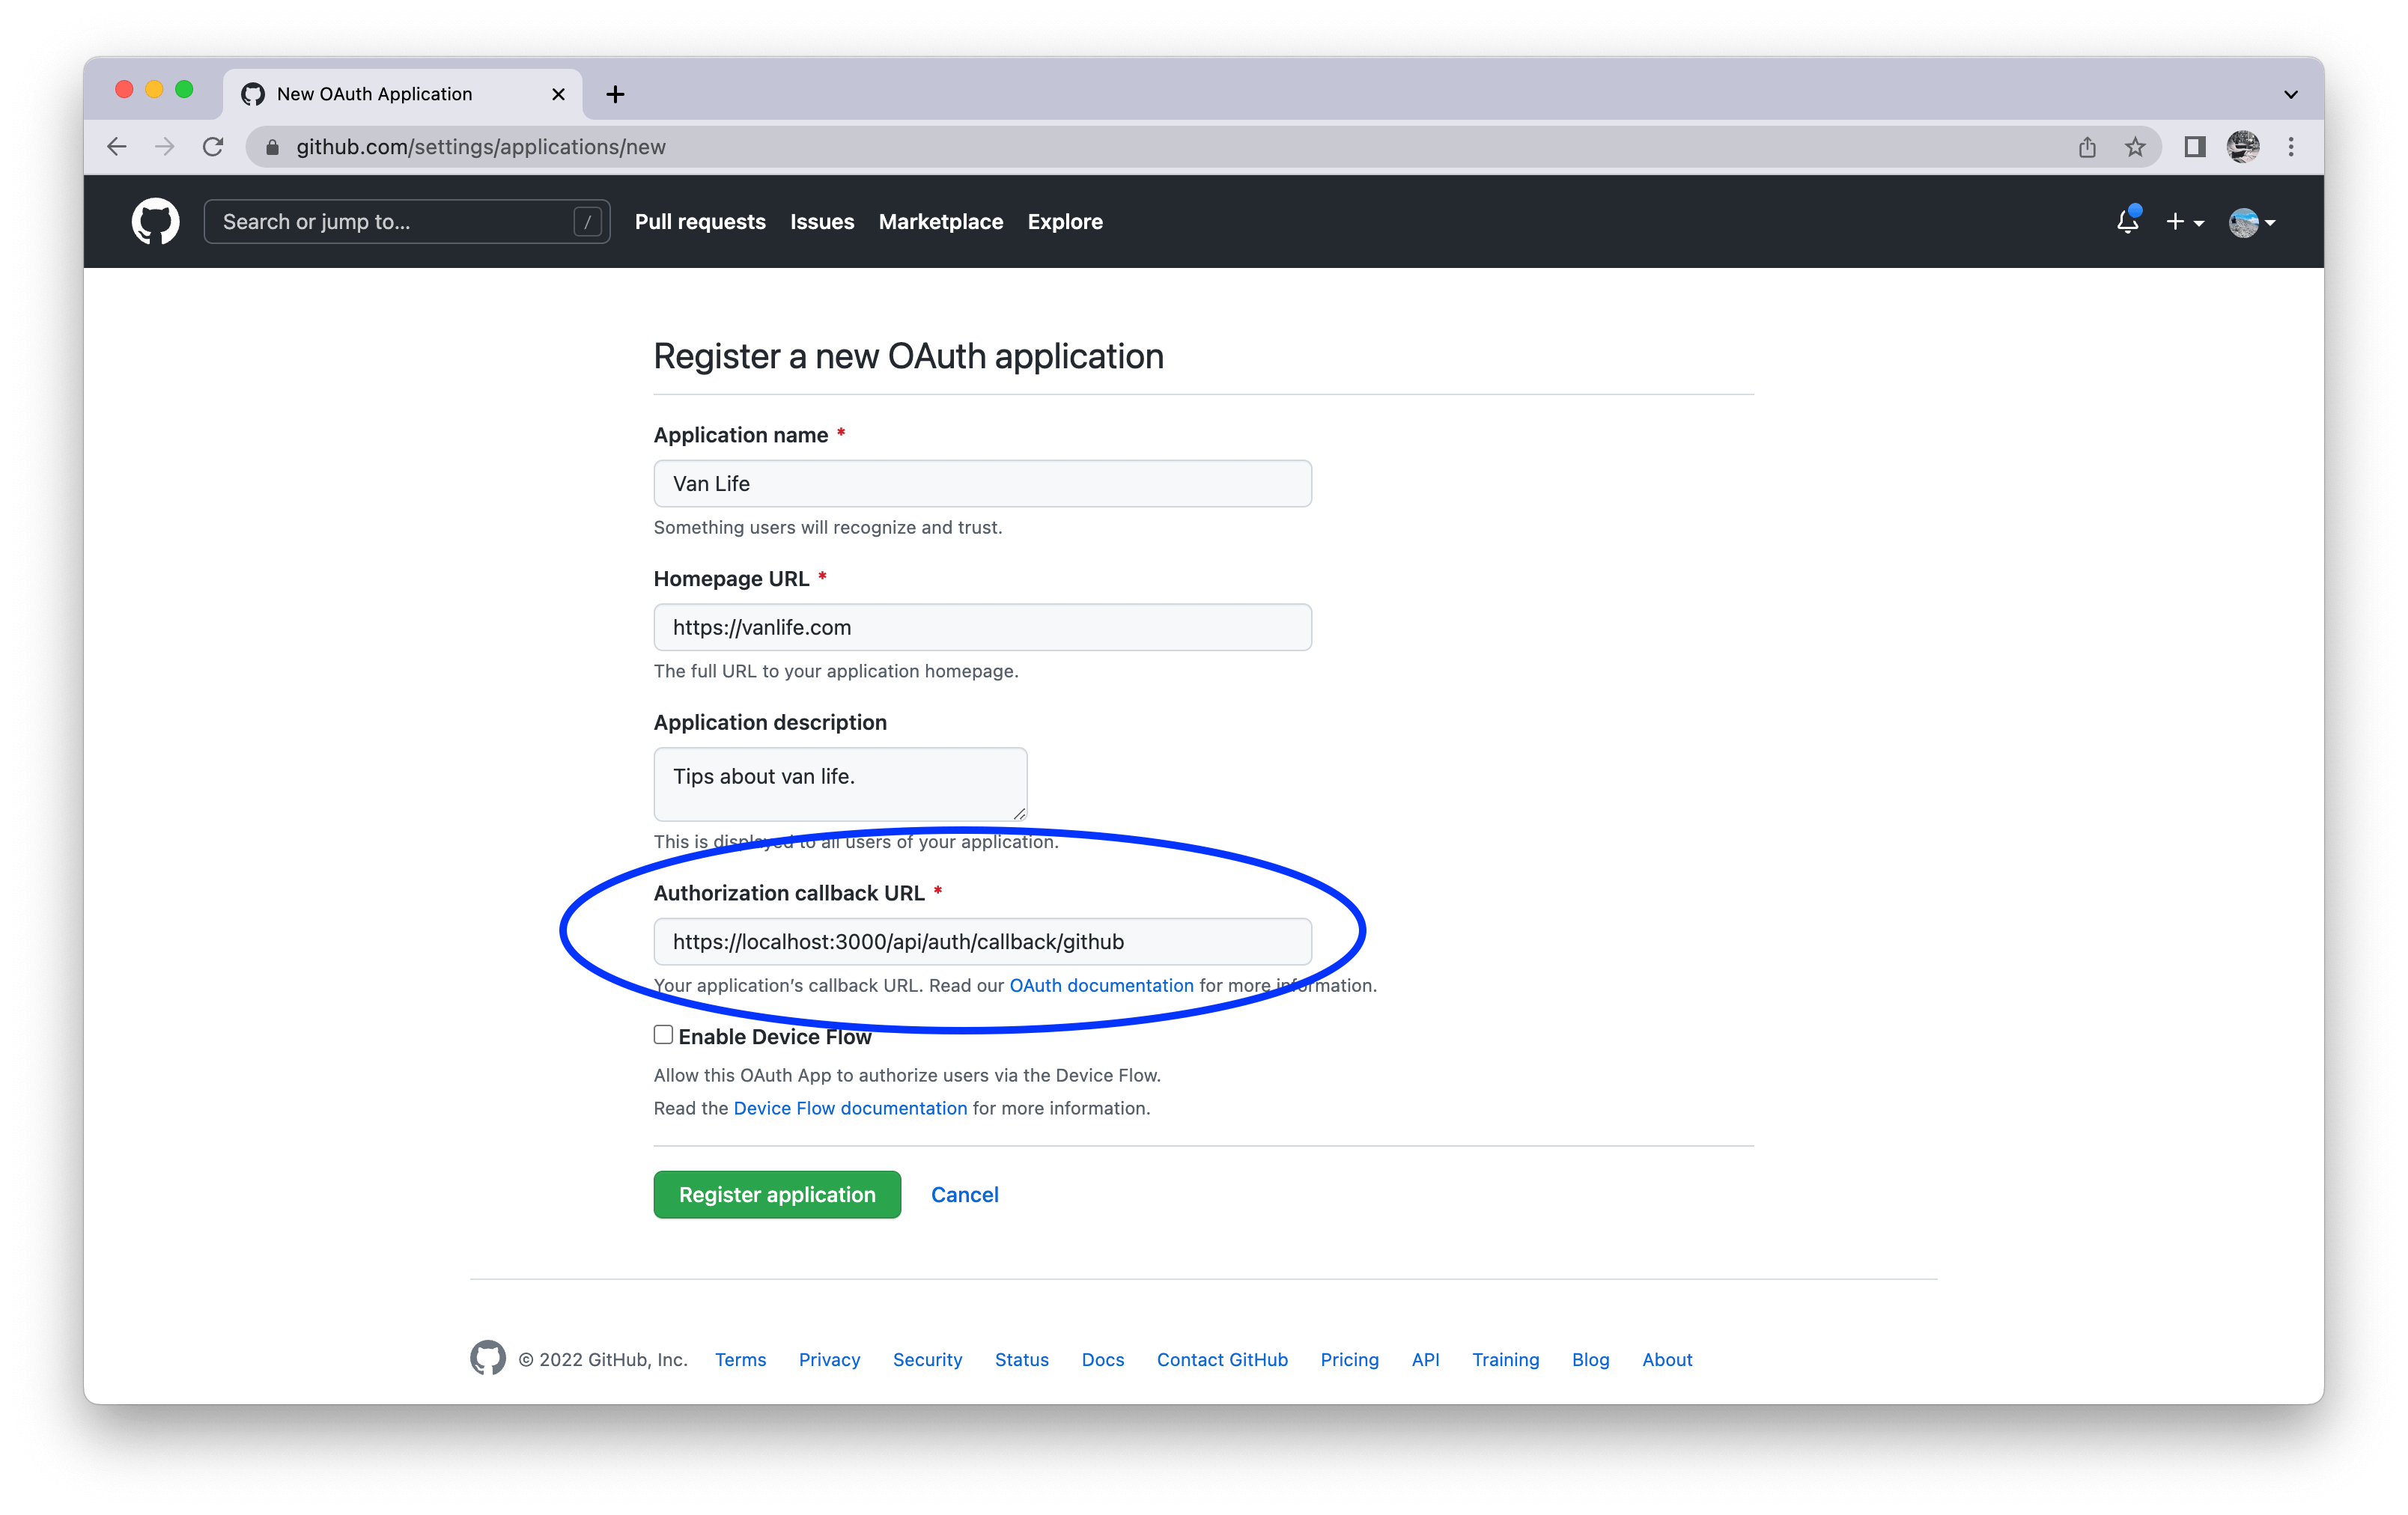
The callback URL we insert should have the following pattern:
[origin]/api/auth/callback/[provider]
In this case, given we want to try our authentication working locally on our machine and we're using GitHub as our OAuth provider, it'll be:
- Next.js
- SvelteKit
- SolidStart
- Vanilla (No Framework)
http://localhost:3000/api/auth/callback/github
NextAuth.js will already create this API endpoint for you when we start the application later. Note that because we're using Next.js, locally it starts our server on port 3000 by default. Hence, the origin is http://localhost:3000.
http://localhost:5173/auth/callback/github
TODO SolidStart
TODO Core
The last part of the URL, [provider], is the ID of the provider you're using. In this case, we're using GitHub, so it's github. If you're using Google, it'll be google, etc... We keep track of the provider IDs internally.
The same id is used in the signIn() method we saw earlier.
To register, tap on "Register application" button.
The next screen shows all the configurations for your newly created OAuth app. For now, we need two things from it - the Client ID and Client Secret:
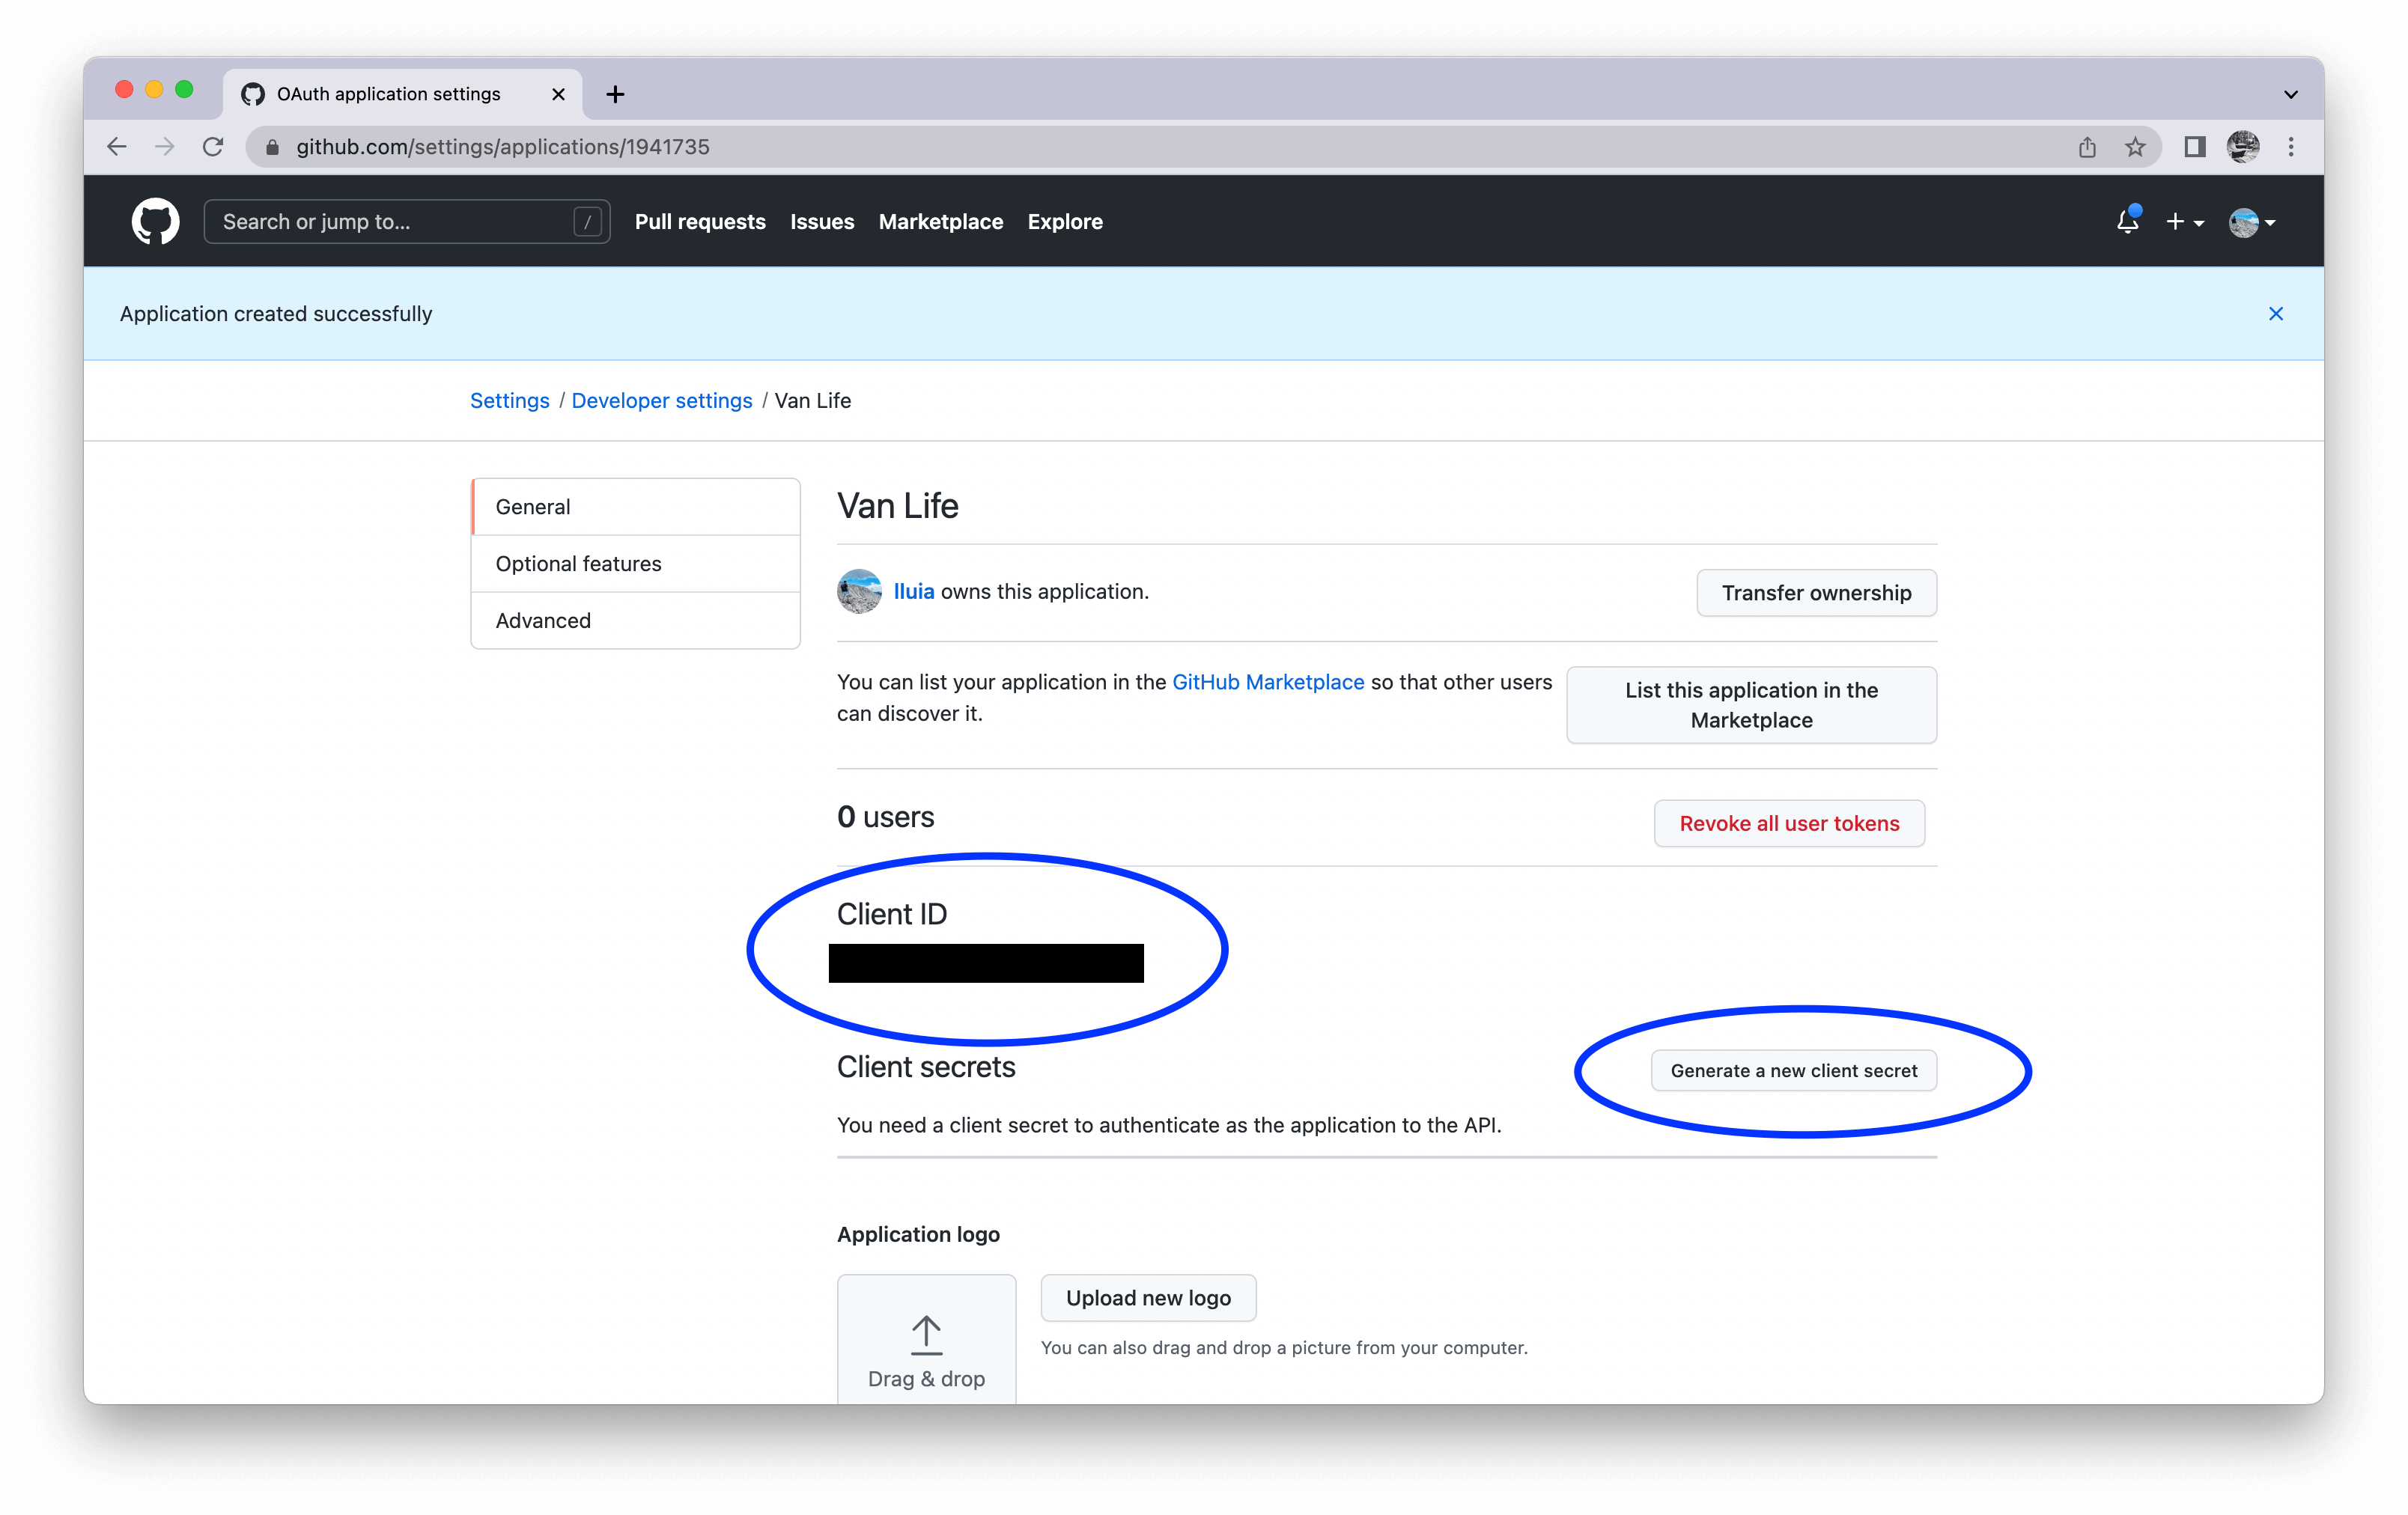
The Client ID is always there, a public identifier of your OAuth application within GitHub. Click on the Generate a new client Secret button and should be presented with a new string (which is just a randomized string).
Keep both your Client ID and Client Secret secure and never expose them to the public or share them with people outside your organization. With them, a malicious actor could hijack your application and cause you and your user serious problems!
Cool! We have finished configuring our OAuth provider, now let's wire all together so we can finally see authentication working in our app!
As noted previously, NextAuth.js has built-in support for multiple OAuth providers, here is the full list. You can also easily build your own in case the provider you need is not on the list.
Note that, for each provider, the configuration process will be similar to what we just did:
- Log in to the provider
- Create create your OAuth application within it
- Set the callback URL
- Get the Client ID and Generate a Client Secret
3. Wiring all together
Finally, we just need to reference our Client ID and Client Secret we just generated in the previous in our Auth.js config. In this way, the library will be able to use them when forwarding users to GitHub, and GitHub will be able to recognize the request as generated from our application.
Now let's copy both the Client ID and Client Secret and paste them into an environment file in the root of your project like so:
GITHUB_ID=12345
GITHUB_SECRET=67890
Here is our server configuration file again:
- Next.js
- SvelteKit
- SolidStart
- Vanilla (No Framework)
import NextAuth from "next-auth"
import GithubProvider from "next-auth/providers/github"

export default NextAuth({
  providers: [
    GithubProvider({
      clientId: process.env.GITHUB_ID,
      clientSecret: process.env.GITHUB_SECRET,
    }),
  ],
})
Great! We're now ready to run our application locally. Start the Next.js app by running on your terminal the following command and navigating to http://localhost:3000:
npm run next dev
import { SvelteKitAuth } from "@auth/sveltekit"
import GitHub from "@auth/core/providers/github"
import { GITHUB_ID, GITHUB_SECRET } from "$env/static/private"
 *
export const handle = SvelteKitAuth({
  providers: [GitHub({ clientId: GITHUB_ID, clientSecret: GITHUB_SECRET })],
})
Great! We're now ready to run our application locally. Start the Svelte app by running on your terminal the following command and navigating to http://localhost:5173:
npm run vite dev
TODO SolidStart
TODO Core
You should see the following page:
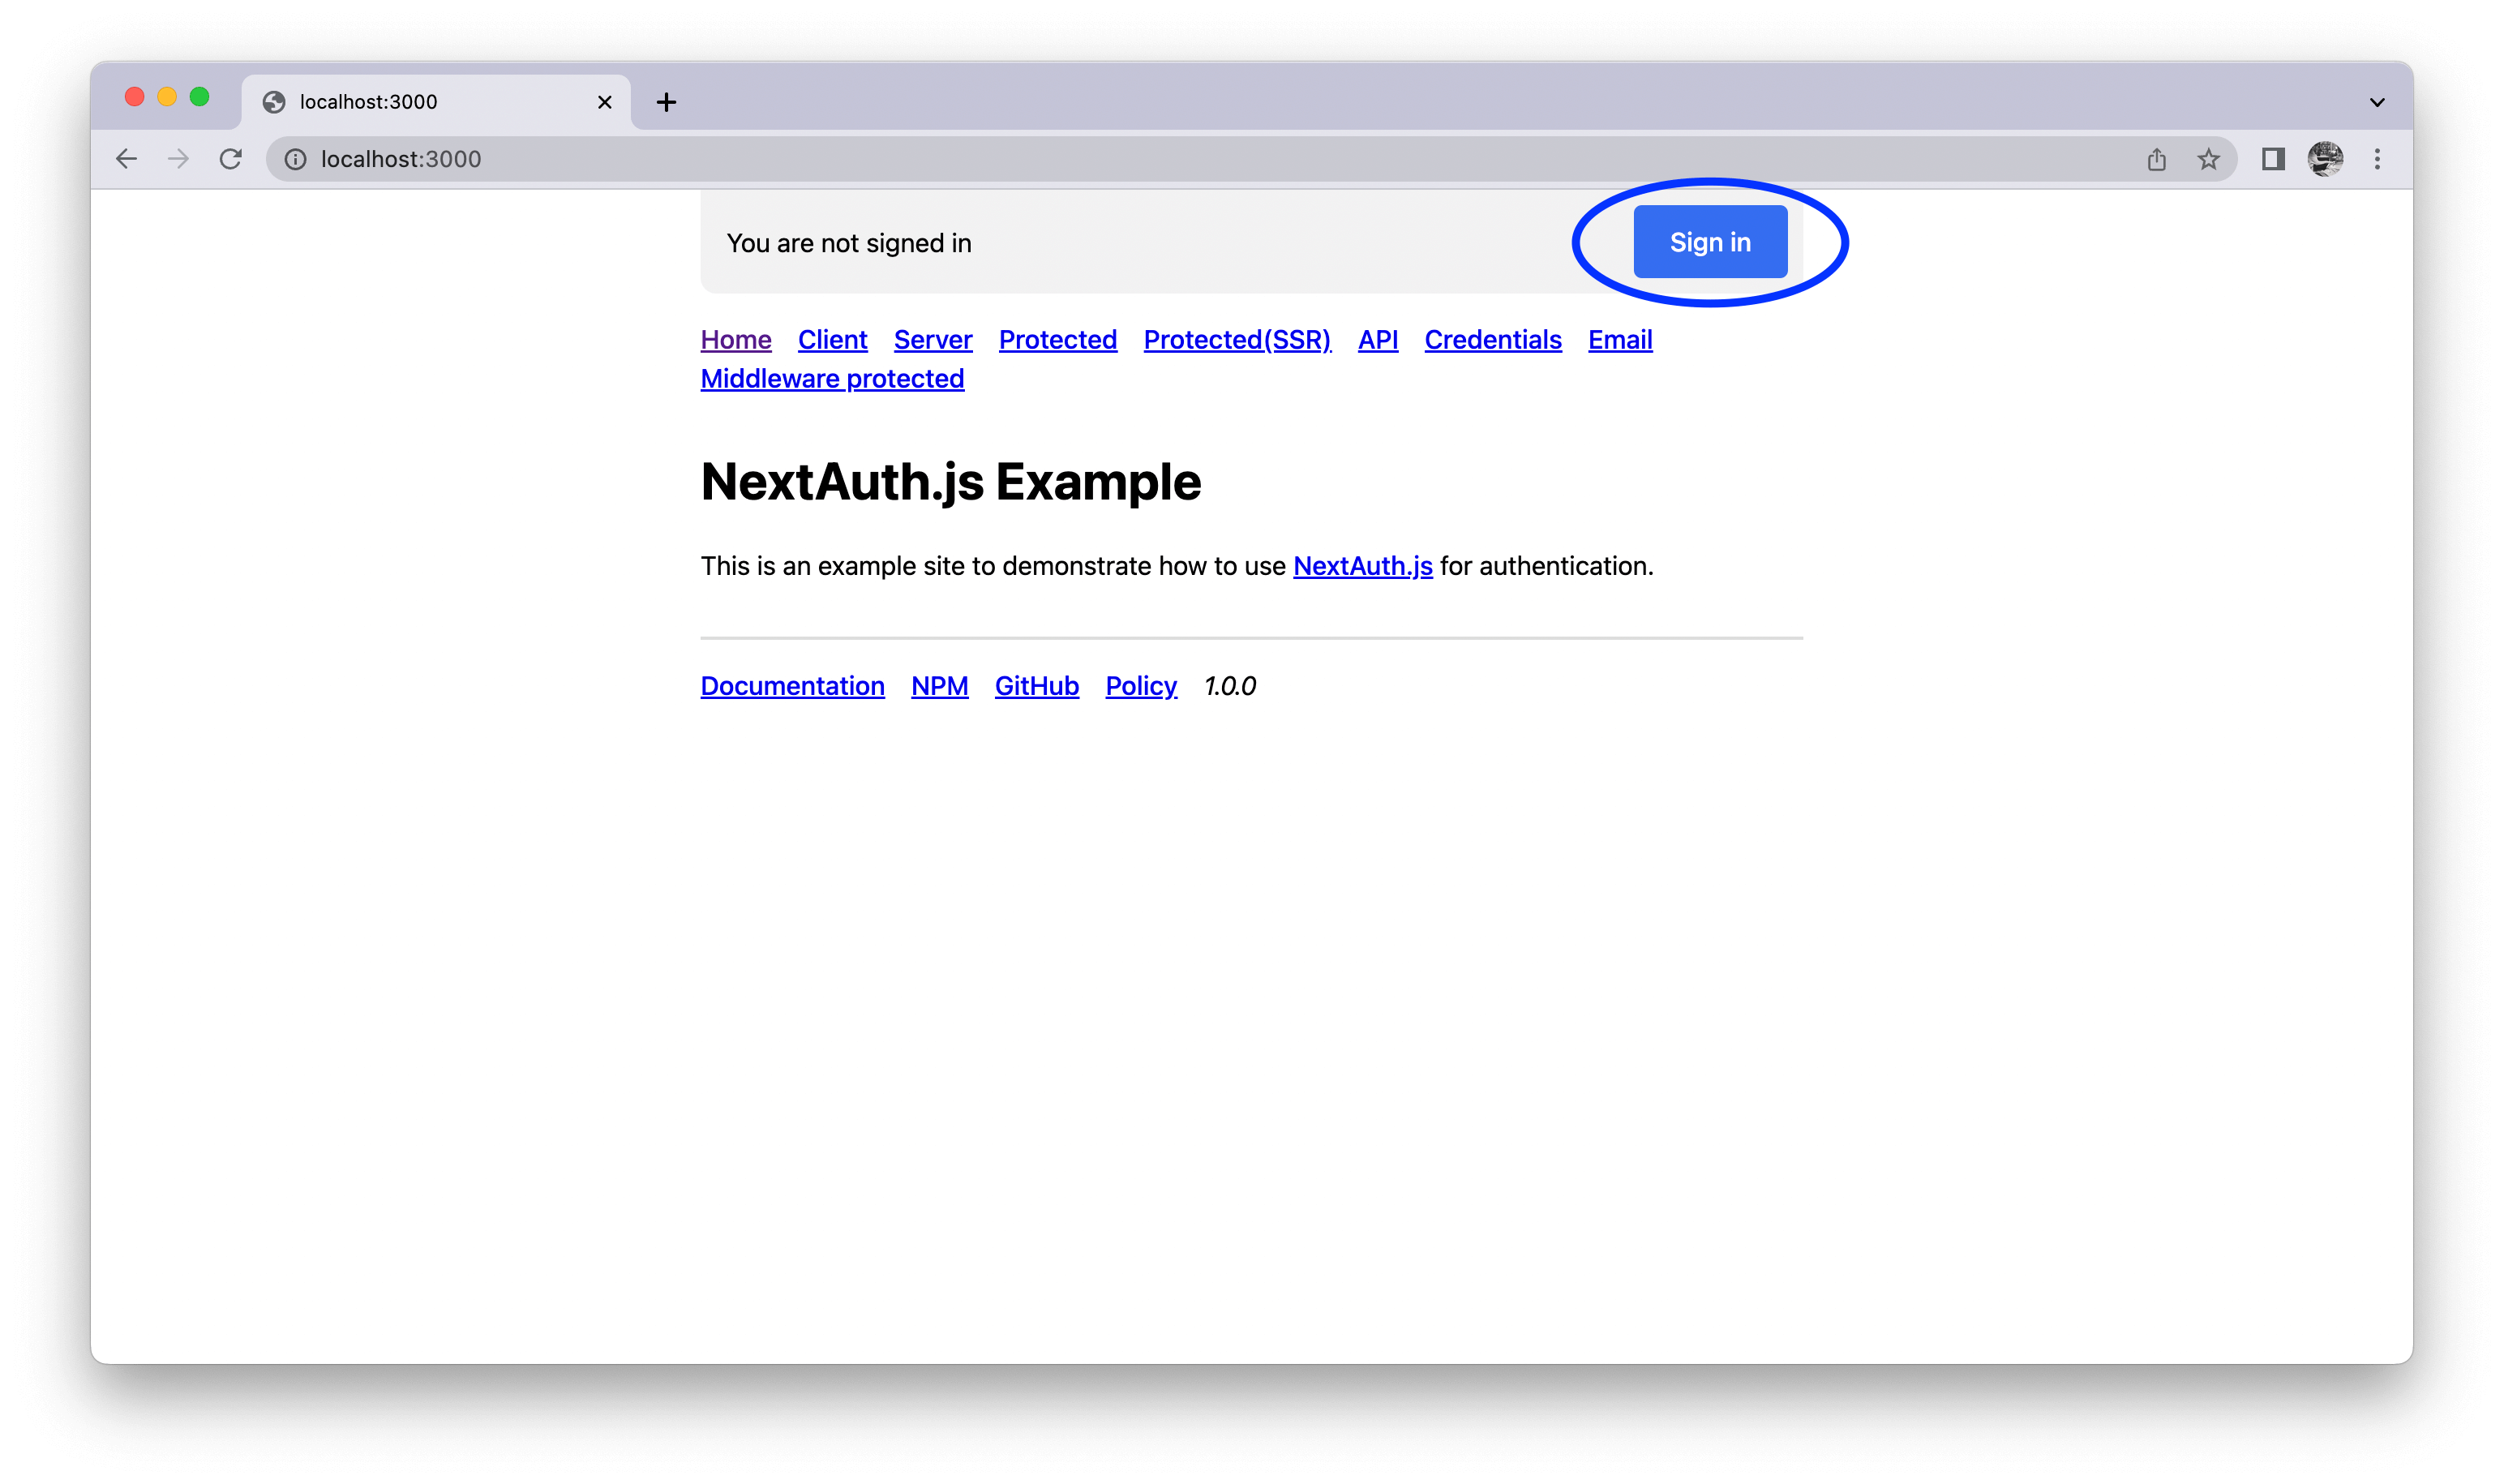
Click on "Sign in" and then on "Sign in with GitHub": Auth.js will redirect you to GitHub, and GitHub will recognize our app that we just registered and ask the user (in this case you) to enter its credentials to proceed:
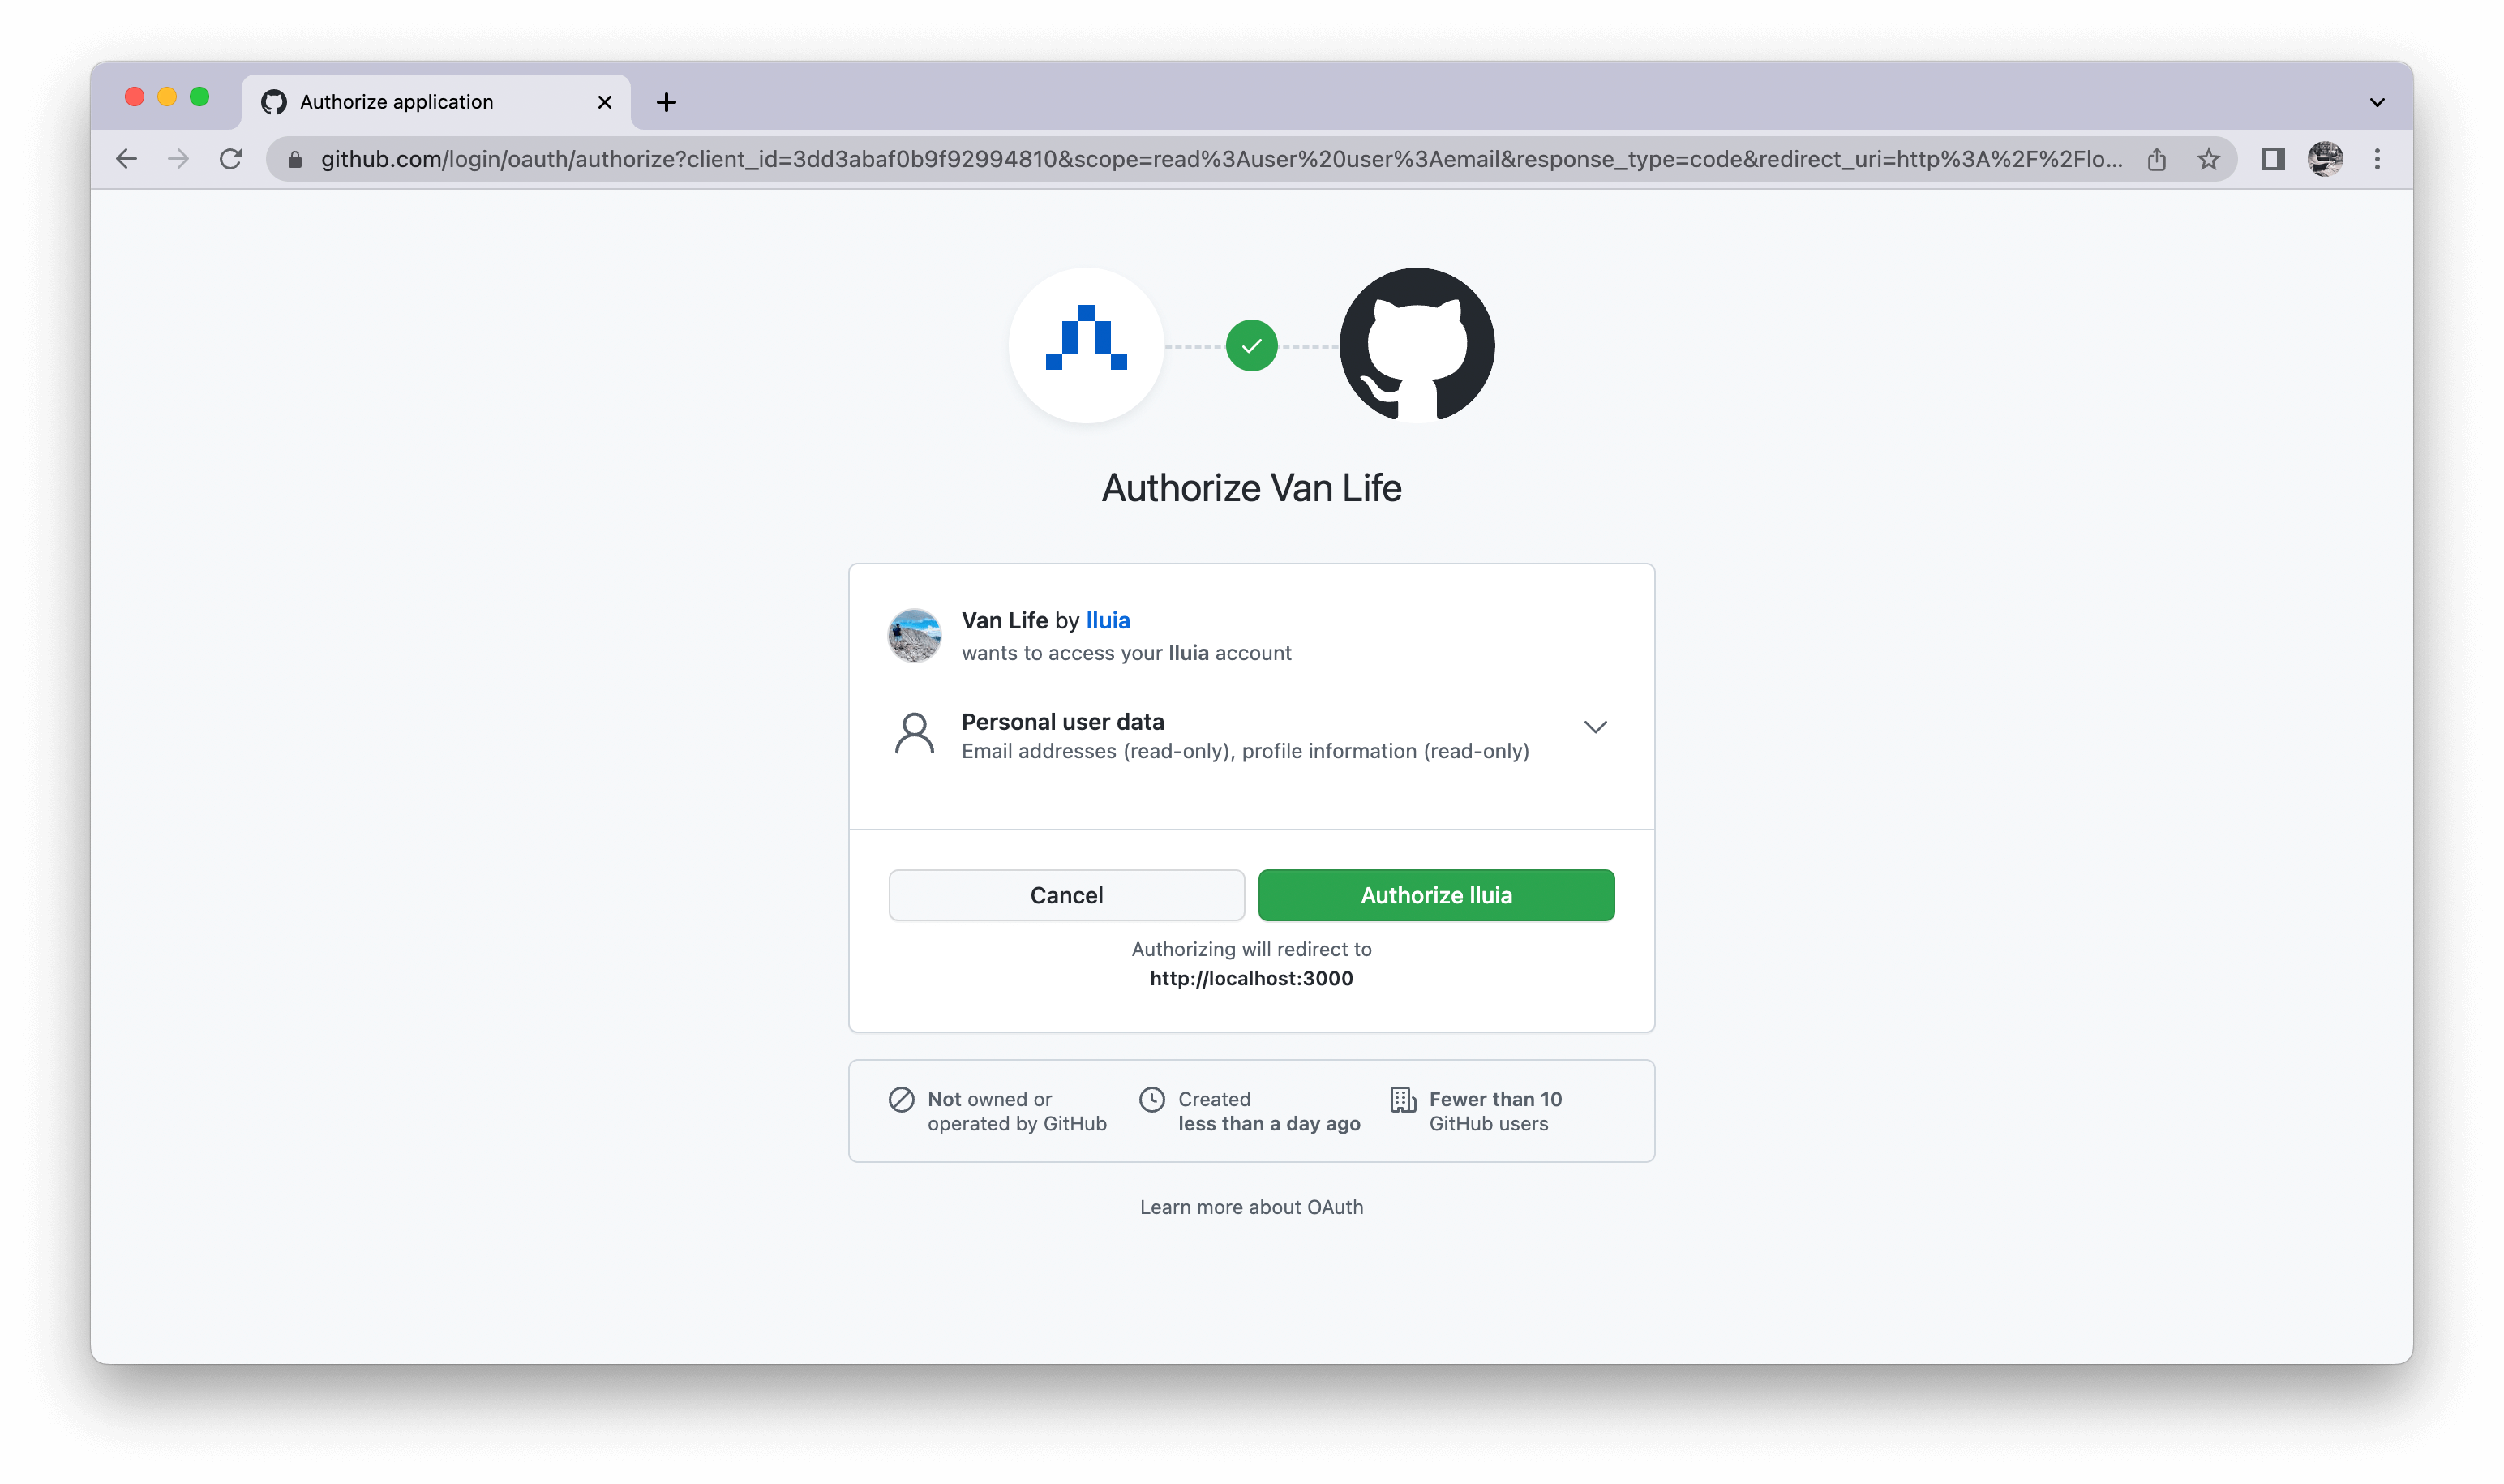
Once inserted and correct, GitHub will redirect the user to our app and NextAuth.js will take care of any further calls with GitHub to get access to the user profile and start a user session safely in the background:
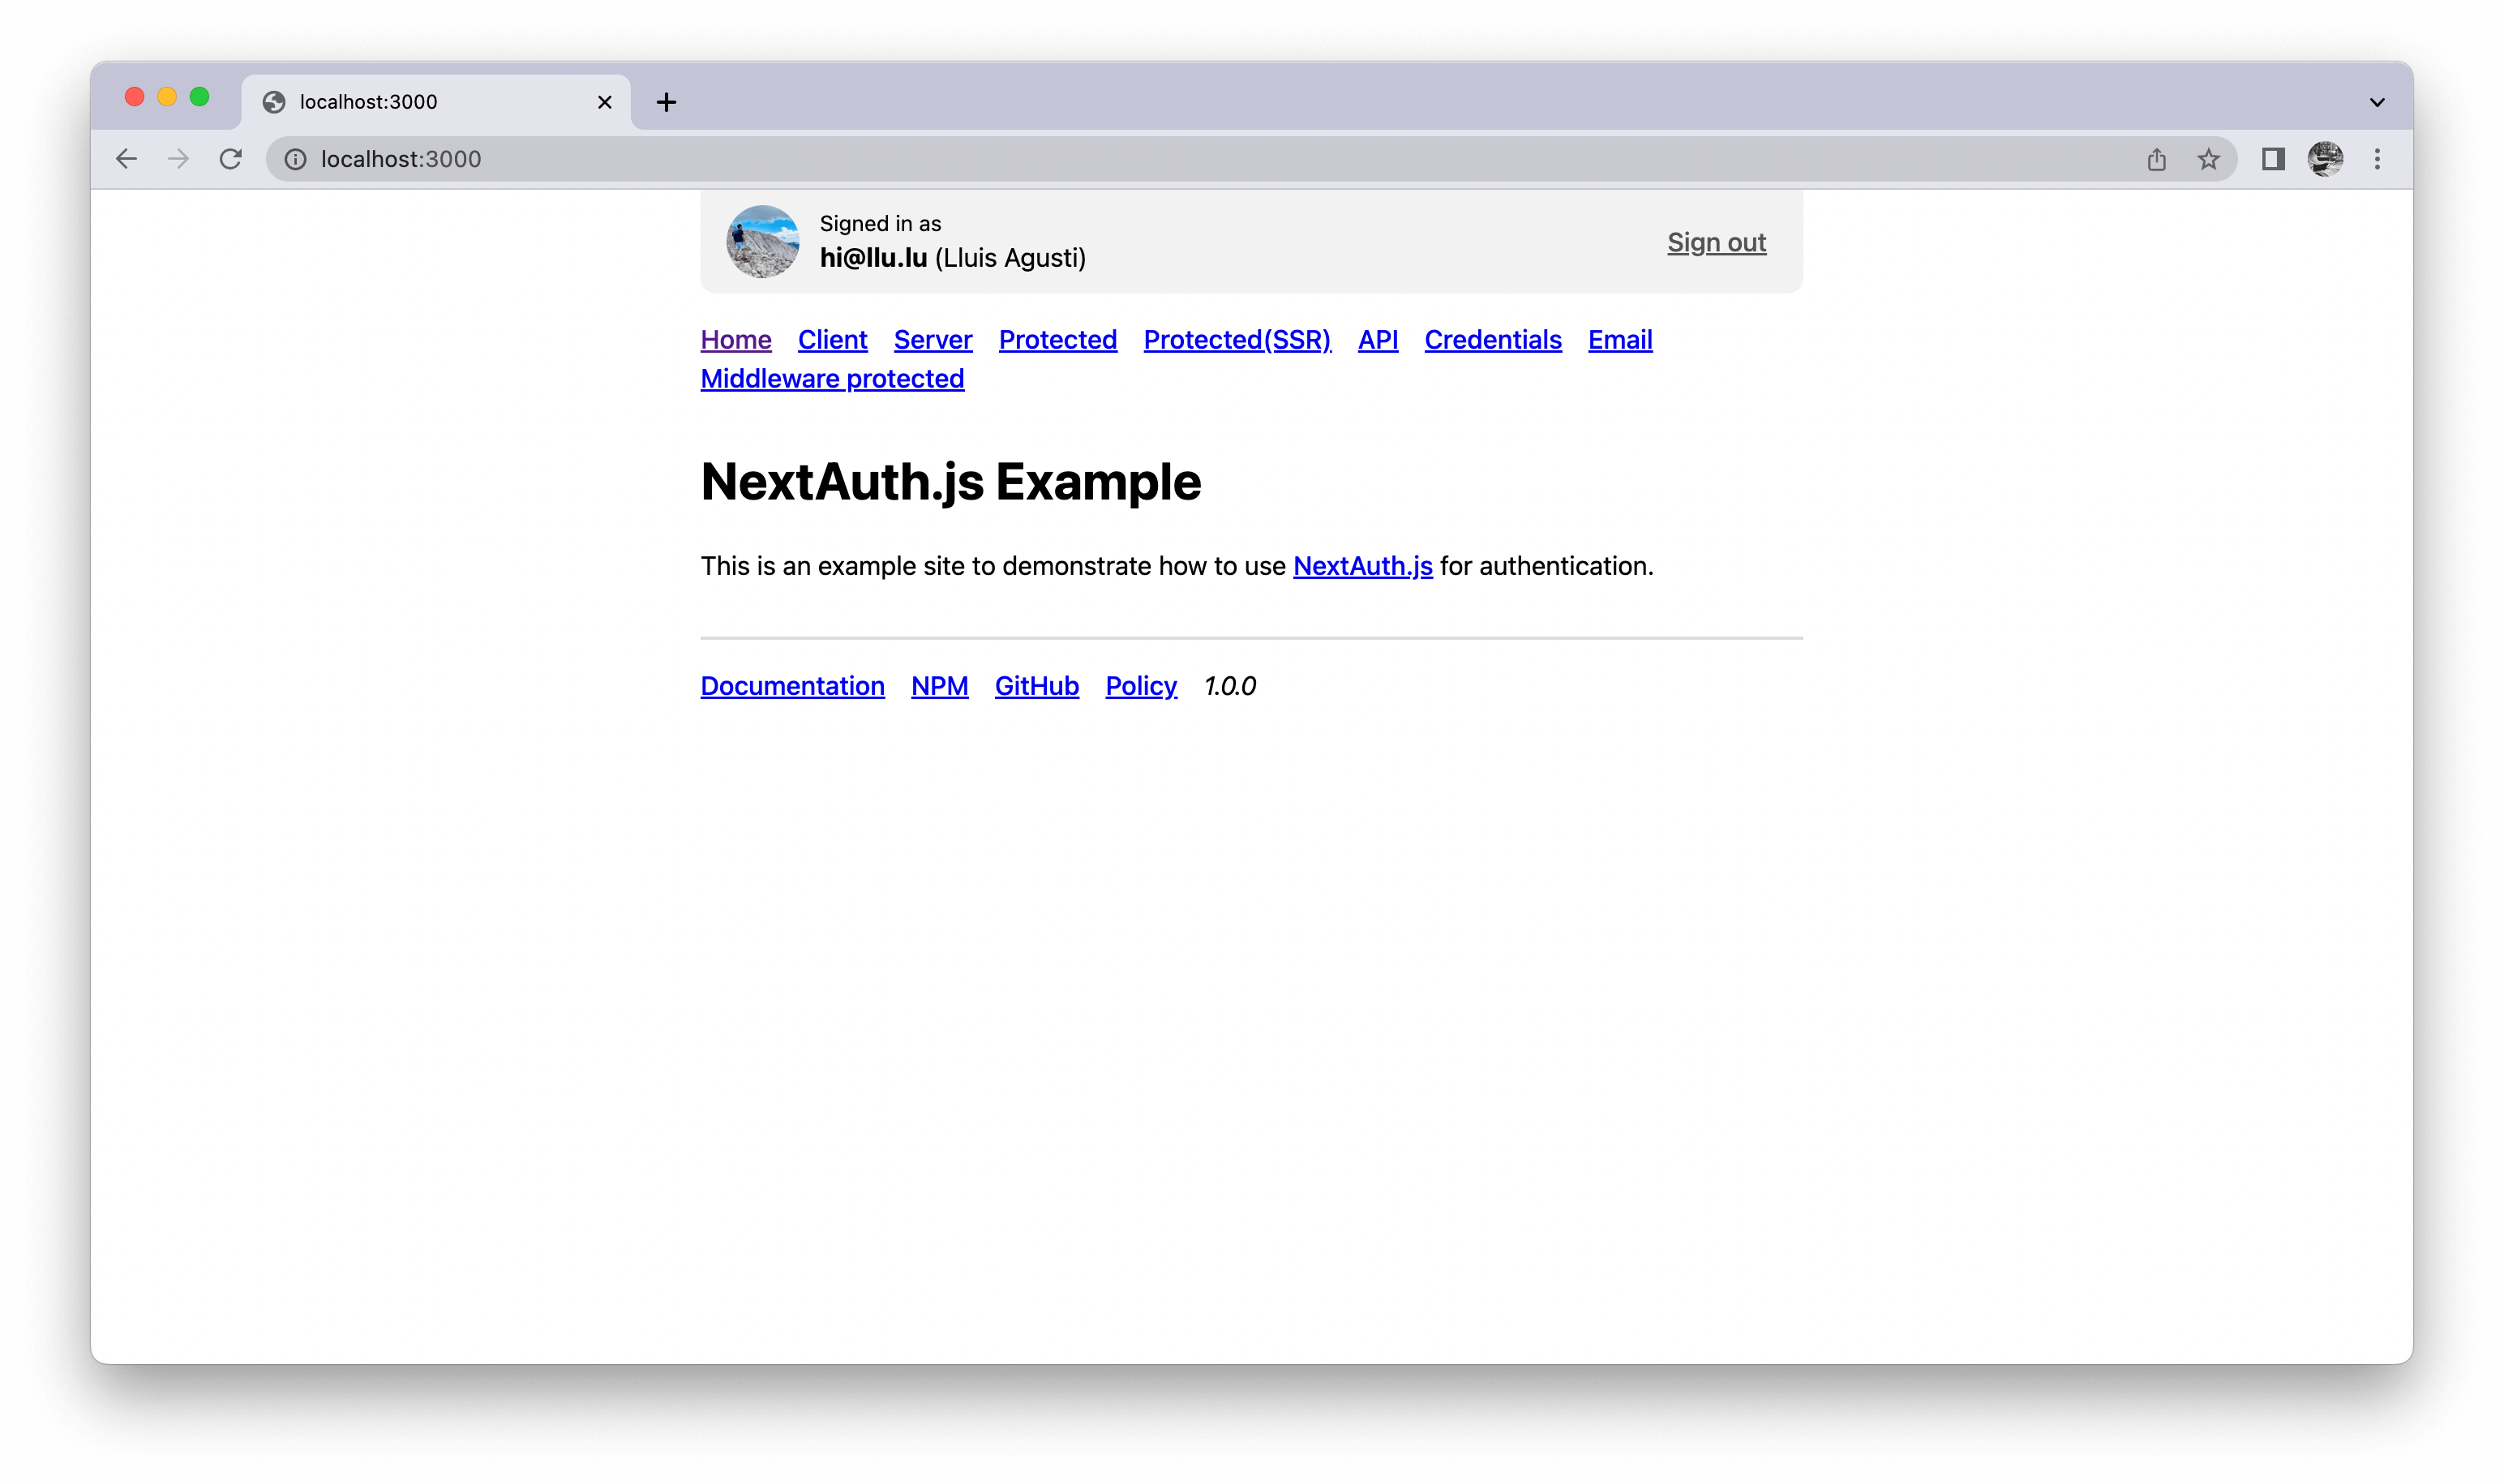
Great! We have completed the whole E2E authentication flow setup so that users can log in to our application through GitHub!
4. Deploying to production
Configuring different environments
It's normal to test your application in different environments. Usually, you'll have a development environment (when you run the application locally on your machine), a staging environment (for team members to try the application), and a production environment.
For each environment, you need to create an OAuth application in your provider respectively, as we did previously, and point the callback URL to it.
For instance, in the previous section, we pointed the callback URL to http://localhost:3000/api/auth/callback/github as we wanted to test our application in the development environment.
If we were to deploy our app to production, we would need to create a new OAuth App in GitHub (calling it something like "Van life – prod") and point the callback URL to our production domain: https://example.com/api/auth/callback/github
Finally, we would need to point the environment variables we set ( GITHUB_ID and GITHUB_SECRET ) to the credentials of the OAuth app we want our application to run with.
Setting up NEXTAUTH_URL
Skip this section if you are deploying to Vercel.
When deploying your site, you need to set the NEXTAUTH_URL environment variable to the canonical URL of your website:
NEXTAUTH_URL=https://example.com
For more information please check out our deployment page.