Credentials Provider
The Credentials provider allows you to handle signing in with arbitrary credentials, such as a username and password, domain, or two-factor authentication or hardware device (e.g. YubiKey U2F / FIDO).
It is intended to support use cases where you have an existing system you need to authenticate users against.
It comes with the constraint that users authenticated in this manner are not persisted in the database by default, and consequently, that the Credentials provider can only be used if JSON Web Tokens are enabled for sessions.
Options
The Credentials Provider comes with a set of default options:
You can override any of the options to suit your own use case.
Example - Username / Password
The functionality provided for credentials-based authentication is intentionally limited to discourage the use of passwords due to the inherent security risks of the username-password model.
OAuth providers spend significant amounts of money, time, and engineering effort to build:
- abuse detection (bot-protection, rate-limiting)
- password management (password reset, credential stuffing, rotation)
- data security (encryption/salting, strength validation)
and much more for authentication solutions. It is likely that your application would benefit from leveraging these battle-tested solutions rather than try to rebuild them from scratch.
If you'd still like to build password-based authentication for your application despite these risks, Auth.js gives you full control to do so.
The Credentials provider is specified like other providers, except that you need to define a handler for authorize() that accepts credentials submitted via HTTP POST as input and returns a user object, which indicates the credentials are valid.
If you return an object it will be persisted to the JSON Web Token and the user will be signed in (unless a custom signIn() callback is configured that subsequently rejects it).
-
If you return
nullthen an error will be displayed advising the user to check their details. -
If you throw an Error, the user will be sent to the error page with the error message as a query parameter.
The Credentials provider's authorize() method also provides the request object as the second parameter. Here's an example that handles these concerns.
import CredentialsProvider from "next-auth/providers/credentials";
...
providers: [
  CredentialsProvider({
    // The name to display on the sign in form (e.g. "Sign in with...")
    name: "Credentials",
    // `credentials` is used to generate a form on the sign in page.
    // You can specify which fields should be submitted, by adding keys to the `credentials` object.
    // e.g. domain, username, password, 2FA token, etc.
    // You can pass any HTML attribute to the <input> tag through the object.
    credentials: {
      username: { label: "Username", type: "text", placeholder: "jsmith" },
      password: {  label: "Password", type: "password" }
    },
    async authorize(credentials, req) {
      // Add logic here to look up the user from the credentials supplied
      const user = { id: "1", name: "J Smith", email: "jsmith@example.com" }

      if (user) {
        // Any object returned will be saved in `user` property of the JWT
        return user
      } else {
        // If you return null then an error will be displayed advising the user to check their details.
        return null

        // You can also Reject this callback with an Error thus the user will be sent to the error page with the error message as a query parameter
      }
    }
  })
]
...
See the callbacks documentation for more information on how to interact with the token. For example, you can add additional information to the token by returning an object from the jwt() callback:
callbacks: {
  async jwt({ token, user, account, profile, isNewUser }) {
    if (user) {
      token.id = user.id
    }
    return token
  }
}
Using a database
You can also use the authorize() callback to interact with your database to regain some of the functionality from more powerful providers:
...
providers: [
  CredentialsProvider({
    ...
    async authorize(credentials, req) {
      let user = null

      const saltedPasswordToCheck = passwordToSalt(credentials.password)
      user = await getUserFromDb(credentials.username, credentials.password)

      if (!user) {
        const saltedPassword = passwordToSalt(credentials.password)
        user = await addUserToDb(credentials.username, saltedPassword)
      }

      if (!user) {
        throw new Error("User was not found and could not be created.")
      }

      return user

    }
  })
]
...
Example - Web3 / Signin With Ethereum
The credentials provider can also be used to integrate with a service like Sign-in With Ethereum.
For more information, check out the links below:
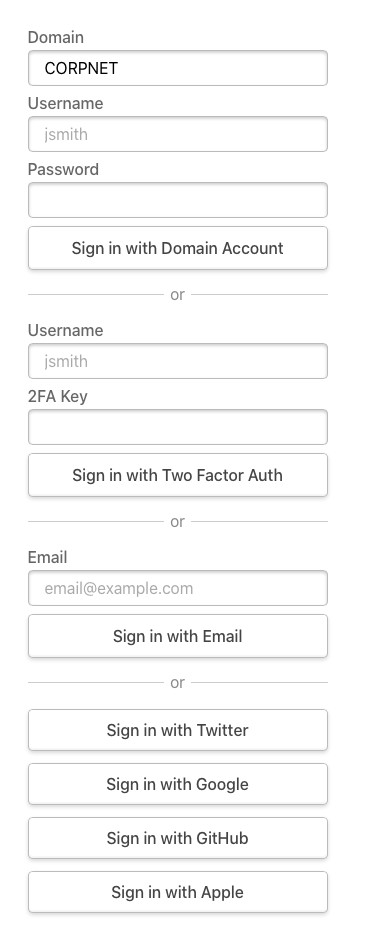
Multiple providers
Example
You can specify more than one credentials provider by specifying a unique id for each one.
You can also use them in conjunction with other provider options.
As with all providers, the order you specify is the order they are displayed on the sign-in page.
providers: [
  CredentialsProvider({
    id: "domain-login",
    name: "Domain Account",
    async authorize(credentials, req) {
      const user = {
        /* add function to get user */
      }
      return user
    },
    credentials: {
      domain: {
        label: "Domain",
        type: "text ",
        placeholder: "CORPNET",
        value: "CORPNET",
      },
      username: { label: "Username", type: "text ", placeholder: "jsmith" },
      password: { label: "Password", type: "password" },
    },
  }),
  CredentialsProvider({
    id: "intranet-credentials",
    name: "Two Factor Auth",
    async authorize(credentials, req) {
      const user = {
        /* add function to get user */
      }
      return user
    },
    credentials: {
      email: { label: "Username", type: "text ", placeholder: "jsmith" },
      "2fa-key": { label: "2FA Key" },
    },
  }),
  /* ... additional providers ... /*/
]